Using Exif Data to Annotate Images in GatsbyJS
After using a custom site builder for a while, I decided to migrate everything over to GatsbyJS. Building a static site builder of my own was an interesting challenge, but I wasn't motivated to add all of the polish to my site builder that exists in other tools, like Gatsby.
Surprisingly, the migration itself went smoothly. A lot of my static, non-blog pages were reliant on hand-coded HTML, which became a pain to update. With Gatsby and GraphQL, I was able to write queries that sped up development of the home and projects pages.
This, however, is not the focus of today's post.
I've been wanting to add some of my glitch art as to my site. Doing that with my old site builder was unpleasant. Using Gatsby was slightly confusing, but I got a gallery up and running pretty quickly, with thumbnails on the front page that linked to full-size versions of the images.
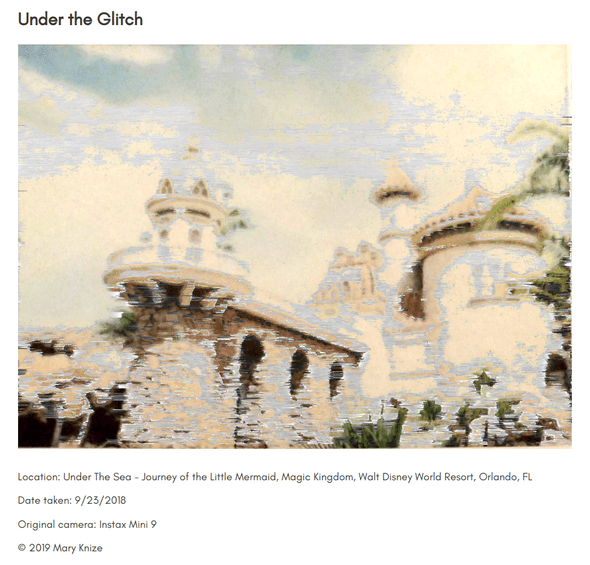
I wanted to do more than that, though. I've been giving my pictures horrible glitch pun titles, and I feel like the rest of the world needs to enjoy horrible glitch puns, too. What I needed to do was create a custom page for each image and be able to pull information from the image to present on the page.
One way to do this would be for each image to have its own directory, which would contain the image and a markdown file with the information. Then, simply iterate over the directories to create the image pages, much like creating blog pages. However, I didn't want to add more markdown files into the mix. So, I made things more complicated.
As part of the glitch art process I've also been looking into steganography and the idea of hiding secret messages in my art. One way of doing that is by using an exif editor to add additional exif data to images. One command line program for this is exiftool.
sudo apt-get install exiftoolBefore going crazy adding all kinds of exif data, however, I needed to figure out how I would read the exif data from the images I'm adding to Gatsby. Luckily, there's a node module called fast-exif that can quickly read exif data.
For my purposes, I decided to use ImageDescription to hold my image's title, DocumentName for the location of the original picture, ModifyDate for the date the picture was originally taken, Model for the camera I used, and Copyright for copyright info.
Here's an example of how I use exiftool to add the exif data I need:
exiftool -ImageDescription="A Dream is a Glitch Your Heart Makes" -DocumentName="Cinderella Fountain, Magic Kingdom, Walt Disney World Resort, Orlando, FL" -ModifyDate="2018:10:21 10:30:00" -Model="Google Pixel 2" -Copyright="2019 Mary Knize" cinderella_fountain.jpgOne thing I've noticed while using exiftool is that it will create a copy of the original image. I simply delete that copy from my Gatsby image directory.
The next step is using Gatsby's onCreateNode and createPages to process the exif data and programmatically create the image pages in gatsby-node.js.
const path = require('path');
const {createFilePath, createFileNode} = require('gatsby-source-filesystem');
const fastExif = require('fast-exif');

exports.onCreateNode = ({node, getNode, actions}) => {
  const {createNodeField} = actions;

  if (node.sourceInstanceName === `glitch_art` && node.internal.type === `File`) {
    const slug = createFilePath({node, getNode, basePath: `glitch-art`});

    createNodeField({
      node,
      name: `slug`,
      value: `/glitch-art${slug}`
    });

    fastExif.read(node.absolutePath).then(exifData => {
      const title = exifData.image.ImageDescription;
      const location = exifData.image.DocumentName;
      const date = exifData.image.ModifyDate;
      const camera = exifData.image.Model;
      const copyright = exifData.image.Copyright;

      createNodeField({
        node,
        name: `exif`,
        value: {title, location, date, camera, copyright}
      });
    });
  }
}

exports.createPages = ({actions, graphql}) => {
  const {createPage} = actions;
  return graphql(`
  {
    allFile(filter: {sourceInstanceName: {eq: "glitch_art"}}) {
      edges {
        node {
          fields {
            slug
          }
        }
      }
    }
  }`).then(result => {
    if (result.errors) {
      console.log(result.errors);
    }

    const imagePageTemplate = path.resolve('./src/templates/image-page.js');

    result.data.allFile.edges.forEach(({node}) => {
      createPage({
        path: node.fields.slug,
        component: imagePageTemplate,
        context: {
          slug: node.fields.slug
        }
      });
    });
  });
}
This code creates the slug and exif nodes for our GraphQL query, and then creates a page for each image in my glitch_art directory using the template image-page.js.
import React from "react";
import Layout from "../components/layout";
import {graphql} from "gatsby";
import SEO from "../components/seo";

const ImagePage = (props) => {
  const thisImage = props.data.allFile.edges.find(({node}) => {
    return node.fields.slug === props.pageContext.slug;
  }).node;
  const date = new Date(thisImage.fields.exif.date).toLocaleDateString('en-US');

  return (
    <Layout>
      <SEO title={`Mary Knize - Glitch Art - ${thisImage.fields.exif.title}`} keywords={[`programming`, `blog`, `art`]} />
      <h2>{thisImage.fields.exif.title}</h2>
      <a href={thisImage.publicURL}>
        <img alt="Glitch" src={thisImage.publicURL} />
      </a>
      <p>Location: {thisImage.fields.exif.location}</p>
      <p>Date taken: {date}</p>
      <p>Original camera: {thisImage.fields.exif.camera}</p>
      <p>© {thisImage.fields.exif.copyright}</p>
    </Layout>
    )
}

export default ImagePage;

export const imageQuery = graphql`
  query ImageQuery {
    allFile(filter: {sourceInstanceName: {eq: "glitch_art"}}) {
      edges {
        node {
          name
          publicURL
          fields {
            slug
            exif {
              title
              location
              date
              camera
              copyright
            }
          }
        }
      }
    }
  }
`
The image-page template contains the query that pulls in the exif data for us to use in the page. When it renders the page, it finds the correct image based on the page slug (which could probably be more elegantly implemented in the GraphQL query but my filter-fu is weak right now), displays the image using the publicURL, and adds the information using the exif data.
The below screenshot shows the title, location, date, camera, and copyright information from one of my glitch image pages, all pulled directly from the image's exif data. No separate file required!
